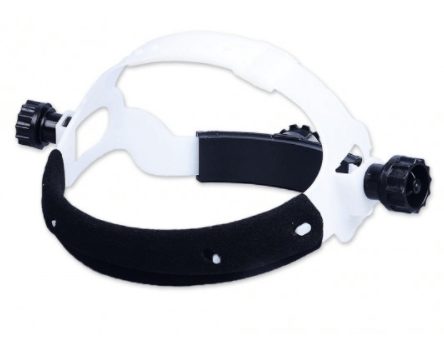
ไส้หน้ากากสวมหัว รุ่น YMD-1405N
Original price was: 70.00 บาท.56.00 บาทCurrent price is: 56.00 บาท.
ไส้หน้ากากสวมหัว อะไหล่หน้ากากเชื่อม ปรับระยะระหว่างดวงตากับหน้ากากได้
- ไส้หน้ากากสวมหัว รุ่น YMD-1405N
- ใช้ใส่กับหน้ากากกันแสงเชื่อมแบบสวมหัว
- สามารถปรับระยะระหว่างดวงตากับหน้ากากกันแสงได้
- 25 ชิ้น/กล่อง

สนใจสอบถามเพิ่มเติม
รายละเอียดเพิ่มเติม
ไส้หน้ากากสวมหัว
Welding Helmet head hoop
- การใช้งาน
- ไส้หน้ากาก ปรับได้ ใช้ใส่กับหน้ากากกันแสงเชื่อมแบบสวมหัว
ไส้หน้ากากสวมหัว รุ่น YMD-1405N STINTERTRADE
ไส้หน้ากากสวมหัว รุ่น YMD-1405N STINTERTRADE
คำแนะนำสำหรับการใช้งาน
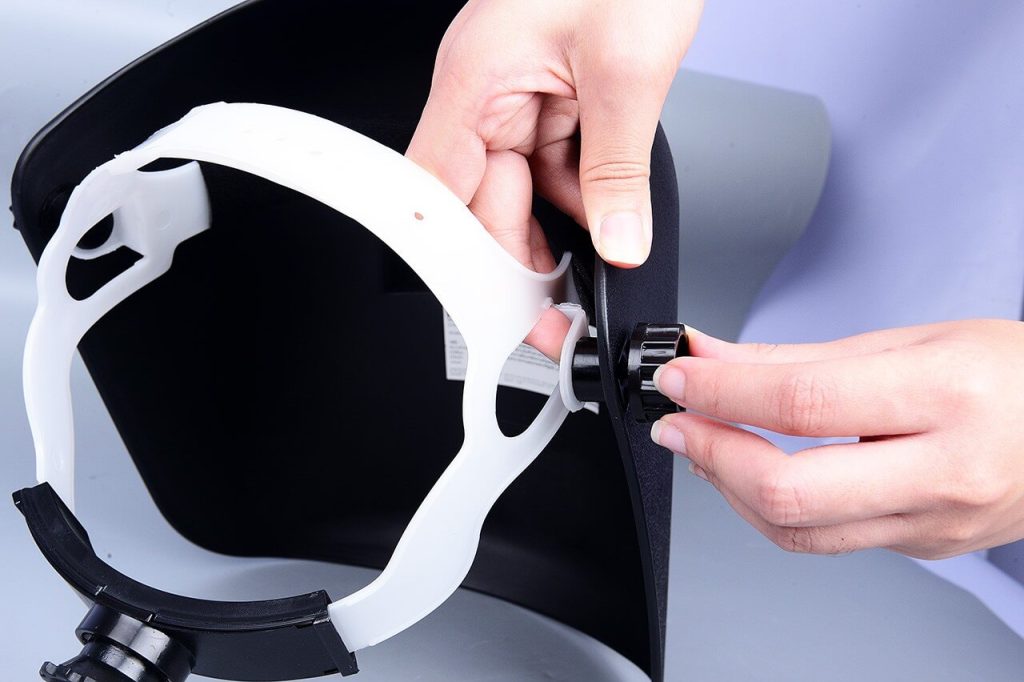
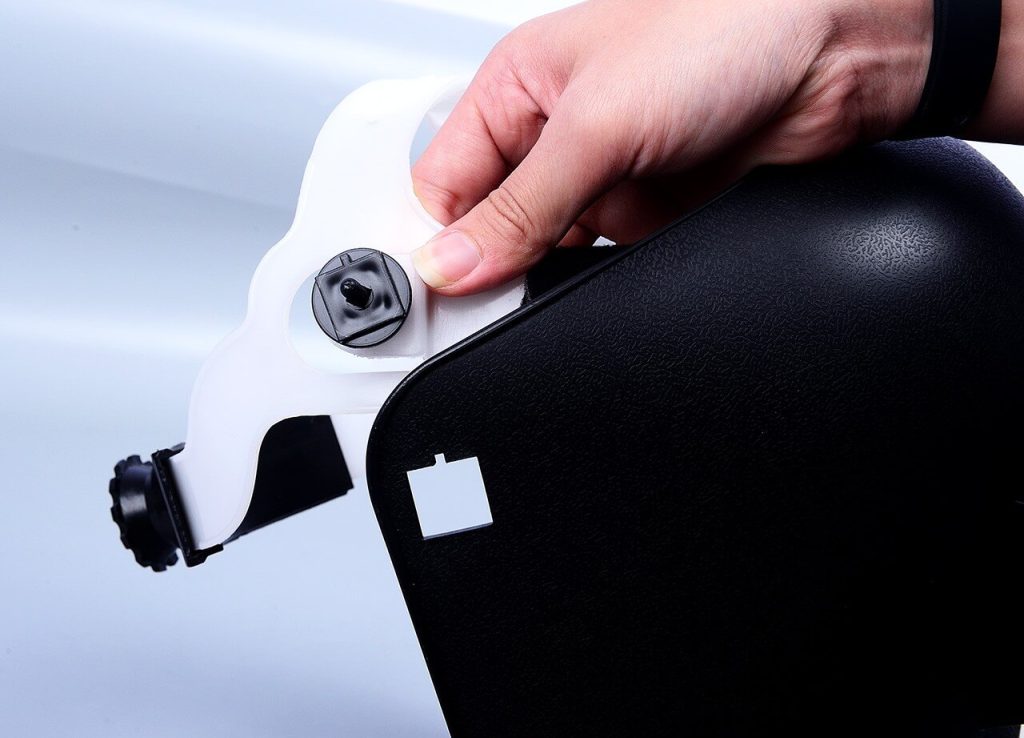
- ปรับสายรัดคาดศีรษะที่พาดผ่านศีรษะเพื่อให้หมวกนิรภัยอยู่บนศีรษะให้ต่ำที่สุด ติดจุก ‘G’ ที่สายรัดด้านล่างเข้าไปในรู ‘F’ ที่สายรัดด้านบน
- ปรับขนาดแถบคาดศีรษะ โดยใช้ปุ่มหมุนที่ด้านหลัง (‘E’) กดและหมุนปุ่มจนกระทั่งแถบคาดศีรษะเข้าที่ แต่ไม่แน่นจนเกินไป
- ใช้ลูกบิด ‘A’ สองปุ่มที่ด้านข้างของหมวกกันน็อคเพื่อปรับปริมาณการเสียดสีที่เกิดขึ้นขณะที่คุณยกและลดระดับหมวกนิรภัย
- เมื่อหมวกนิรภัยอยู่ในตำแหน่งที่ต่ำลง ให้ปรับความสัมพันธ์ให้เข้ากับใบหน้าของคุณ โดยใช้แป้นตำแหน่ง ‘D’ หัวจุก ‘H’ ควรวางไว้ใน 3 รูที่อีกด้านหนึ่งของหมวกนิรภัยจากปุ่มควบคุมที่กันแสง
- ระยะห่างจากตาแต่ละข้างไปยังที่กันแสงยังสามารถปรับได้โดยการคลายปุ่ม ‘A’ และเลื่อนสลักเกลียวพลาสติก ‘B’ เข้าไปในช่องเปิดด้านใดด้านหนึ่งของหมวกนิรภัย
- ตอนนี้คุณพร้อมที่จะใช้หมวกนิรภัยแล้ว อาจปรับการบังแสงระหว่างการใช้งานได้ โดยการตั้งค่าปุ่มควบคุมที่กันแสงใหม่
Instruction for use
- Adjust the headband strap that passes over the head so that the helmet is seated on the head as low as possible. snap the spigot ‘G’ on the lower strap into one of the holes ‘F’ on the upper strap.
- Adjust the size of the headband by using the ratchet knob at the rear (see ‘E’). Depress and turn the knob until the headband sits f irmly in place, but not too tight.
- Use the two knobs ‘A’ on either side of the helmet to adjust the amount of friction that occurs as you raise and lower the helmet.
- When the helmet is in the lowered position, adjust its relationship to your face using the locating plate ‘D’ The spigot ‘H’ should be placed in one of 3 holes on the other side of the helmet from the shade control knob.
- The Distance from each eye to the shade cartridge can also be adjusted by loosening the knob ‘A’ and sliding the plastic bolts ‘B’ within the slotted openings either side of the helmet.
- You are now ready to use the helmet. The shading may ne adjusted during use by re-setting the shade control knob.
- ไส้หน้ากาก ปรับได้ ใช้ใส่กับหน้ากากกันแสงเชื่อมแบบสวมหัว
สินค้าที่เกี่ยวข้อง
หน้ากากหนังแบบคลุมกันแสงเชื่อม รุ่น YMD-605 YAMADA
Original price was: 600.00 บาท.480.00 บาทCurrent price is: 480.00 บาท.
แผ่นกันสะเก็ด CR39 ขนาด 108x51x1.5mm
35.00 บาท
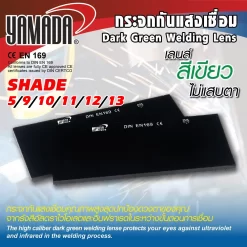
กระจกกันแสงเชื่อมสีเขียวเข้ม YAMADA
Original price was: 14.00 บาท.7.00 บาทCurrent price is: 7.00 บาท.
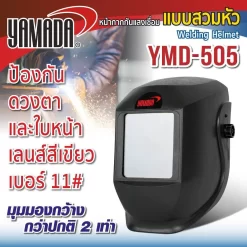
หน้ากากกันแสงเชื่อมแบบสวมหัวเลนส์ใหญ่ (ดำ) รุ่น YMD-505
Original price was: 420.00 บาท.336.00 บาทCurrent price is: 336.00 บาท.
หน้ากากหนังกันแสงเชื่อมอัตโนมัติ รุ่น YMD-616 YAMADA
Original price was: 800.00 บาท.640.00 บาทCurrent price is: 640.00 บาท.

Bosch
Eibenstock

Jasic

Stanley

Makita
