


SUMO กล้องถ่ายความร้อน รุ่น DT-870
- ช่วงการวัดตั้งแต่ ﹣20℃ to 380℃ ใช้ได้หลายสถานการณ์
- อัตราความเร็วความถี่ภาพ 50Hz
- ความละเอียด 80x80 pixels (IR Resolution 80x80 pixels)
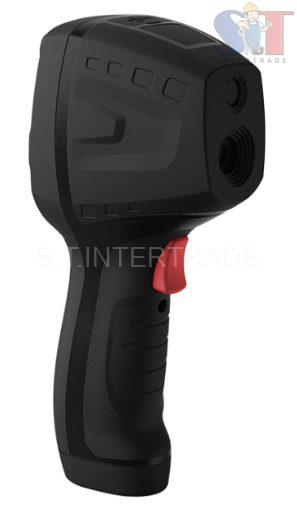
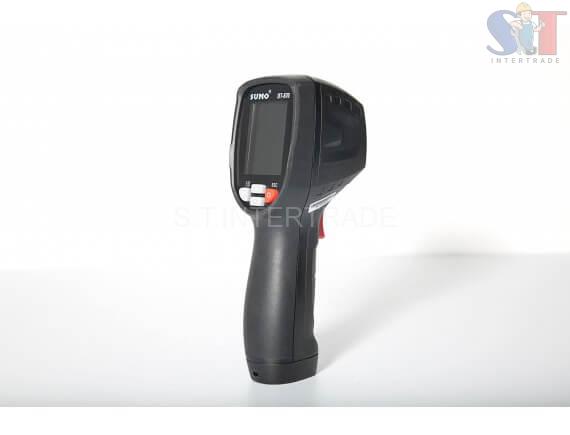
- ออกแบบสวยงาม เล็ก และ น้ำหนักเบา พกพาไปกับเราได้ทุกที่ ทนต่อการตกหล่นได้ถึง 2 เมตร
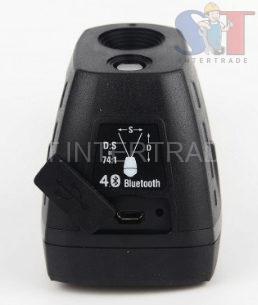
- รองรับระบบปฏิบัติการ Android และ iOS เพื่อเชื่อมต่อบลูทูธกับกล้องถ่ายภาพและส่งถ่ายไปที่อุปกรณ์เคลื่อนที่


สนใจสอบถามเพิ่มเติม
รายละเอียดเพิ่มเติม
SUMO กล้องถ่ายความร้อน รุ่น DT-870
SUMO High Performance Thermal Imager Model DT-870
รายละเอียดสินค้า
DT-870 Thermal Imager is designed to make your work easier, more productive and effective, 80×80 resolution at
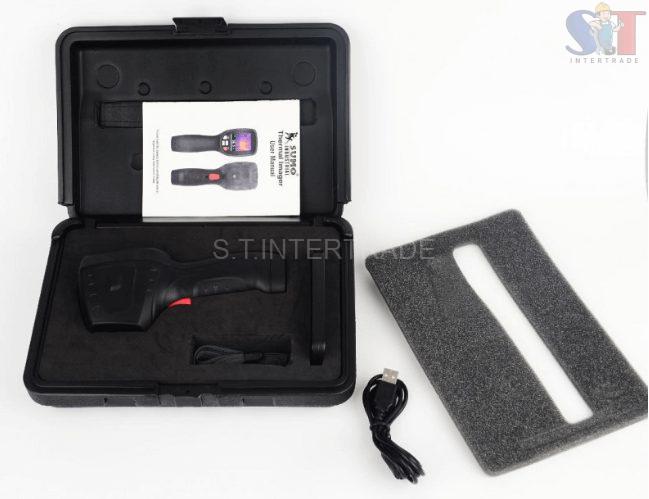
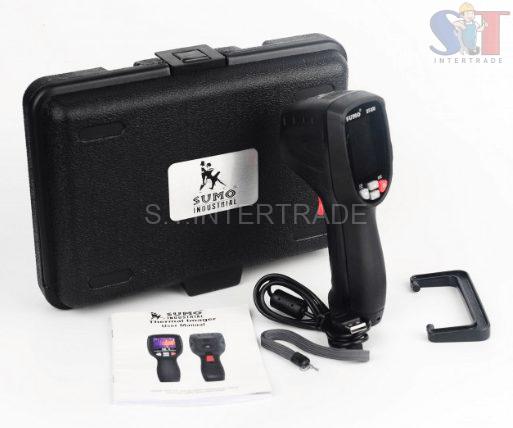
50 Hz for real-time capture; Temperature range from –20ºC to 380ºC (-4ºF to 536ºF). Hot/Cold spot marker automatically finds the hottest and coldest spots. Lithium polymer battery & power supply, and USB cable. Bluetooth connectivity allows the Infrared Thermal Camera to send thermal picture to mobile devices.
กล้องถ่ายภาพความร้อน DT-870 Thermal Imager ออกแบบมาเพื่อการทำงานที่ง่ายขึ้น มีประสิทธิภาพและประสิทธิผลเพิ่มขึ้น ความละเอียด 80 x 80 pixels ที่ 50 เฮริตซ์ สำหรับการจับภาพตามเวลาจริง ช่วงการวัดอุณหภูมิ –20 องศาเซลเซียส ถึง 380 องศาเซลเซียส (-4 องศาฟาเรนไฮต์ ถึง 536 องศาฟาเรนไฮต์) แสดงจุดที่ร้อนที่สุดและเย็นที่สุดอัตโนมัติ แบตเตอรี่ลิเธี่ยมโพลีเมอร์ และ สามารถเชื่อมต่อกับคอมพิวเตอร์ผ่านพอร์ท USB. การเชื่อมต่อ Bluetooth ช่วยให้อินฟราเรดส่งภาพความร้อนไปยังอุปกรณ์มือถือได้ดี
คุณสมบัติ:
- เครื่องมือสามารถจัดเก็บภาพได้ 20 ภาพ ในหน่วยความจำภายใน การบันทึกภาพ สามารถโอนไปยัง iOS, android และ PC ผ่านอุปกรณ์บลูทูธได้
- อัตราความเร็ว 50Hz จับภาพอุณหภูมิได้เร็วต่างกัน
- ช่วงอุณหภูมิสูงตั้งแต่ -20 ถึง 380 องศาเซลเซียส ใช้ได้หลายสถานการณ์
- ใช้งานง่าย
- ออกแบบสวยงาม เล็ก และ น้ำหนักเบา พกพาไปกับเราได้ทุกที่
- ทนต่อการตกหล่นได้ถึง 2 เมตร
Features:
- 50Hz fast frame rate, fast capture temperature varies
- High temperature range -20 to 380๐C, more application situation
- Simple operate, easy to use
- Smart design, Portable, Small and lightweight to carry with you anywhere
- Durable, withstand up to a 2m drop
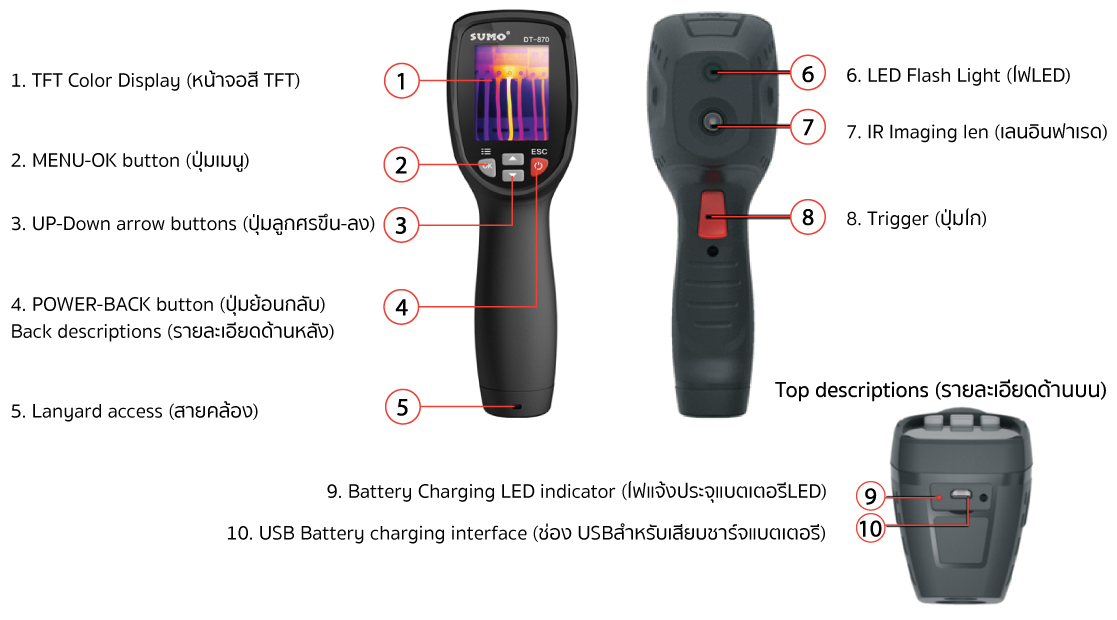
Descriptions (รายละเอียด)
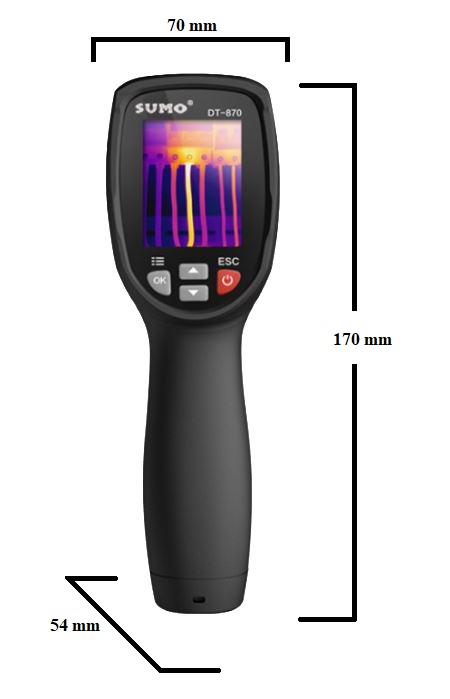
รายละเอียดเครื่อง
|
สูง/ high |
170 mm |
|
ด้านข้าง / Beside |
70 mm |
|
กว้าง / width |
54 mm |
|
น้ำหนัก / weight |
254.6 g |
วิธีใช้งาน
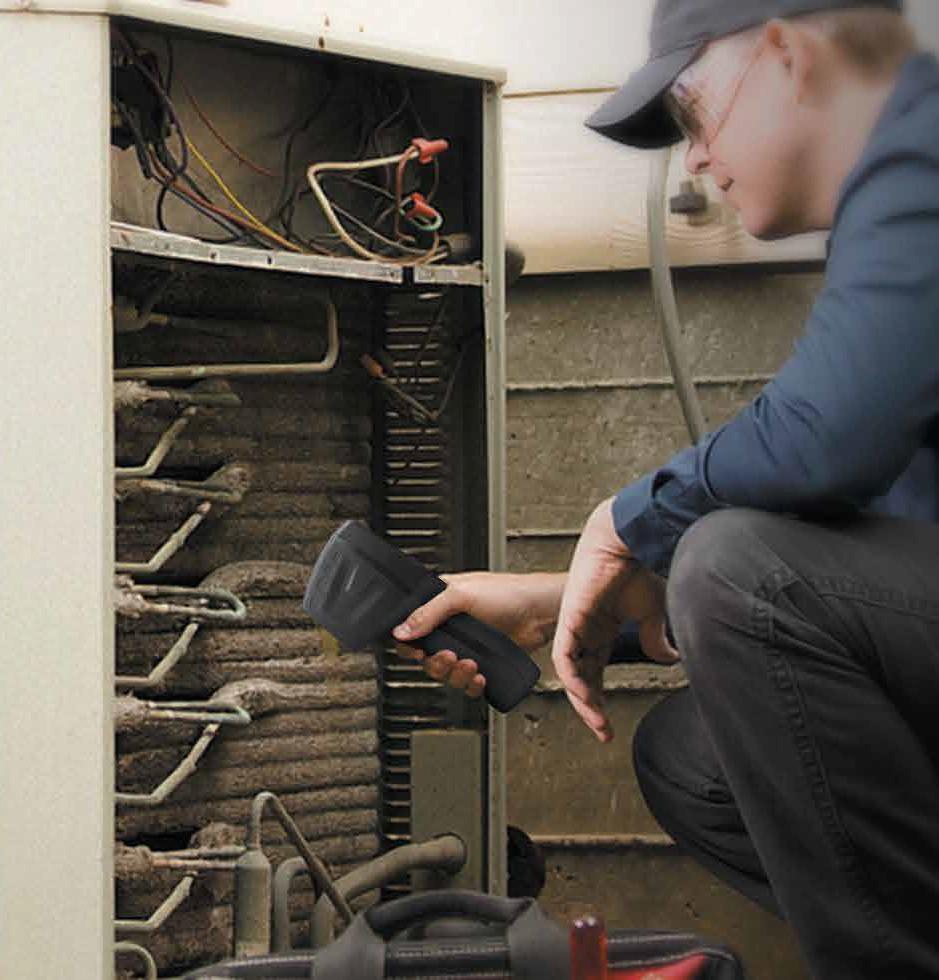
- เล็งเครื่องมือไปที่วัตถุหรือพื้นที่ที่น่าสนใจ
- กดไกสั้นๆ เพื่อจับภาพที่จะยิง ภาพจะหยุดการเคลื่อนไหว
- หากไม่ต้องการบันทึกภาพปัจจุบัน กดที่ไกสั้นๆ อีกครั้ง ภาพจะถูกยกเลิกจากการควบคุม
- กดปุ่ม “SAVE” เพื่อทำการบันทึกภาพ
- หากภาพถูกจัดเก็บในหน่วยความจำจนเต็ม ภาพจะไม่มีการบันทึก
How to use
- Point the unit at an object or an area of interest.
- Short press the trigger to capture the image, the image will freeze.
- If don’t want to save the current image, short press the trigger again, the image will unfreeze.
- Press “SAVE” to save the image.
- If the image is stored successfully on the internal memory the image will unfreeze.


วิธีใช้งาน : ขั้นตอนพื้นฐานและการใช้งานแบบง่ายๆ
- กดปุ่มเปิดค้างไว้มากกว่า 2 วินาที ภาพสัญลักษณ์เริ่มการทำงานจะปรากฏตามด้วยจอแสดงภาพความร้อน ถ้าหากแบตเตอรี่จำเป็นต้องชาร์จใหม่โปรดดูส่วนที่ 2 ต่อไป
- หันเครื่องไปทางบริเวณหรือวัตถุที่สนใจและดูภาพความร้อน อุณหภูมิสัมพัทธ์จะถูกแทนด้วยสี ร้อน ถึง เย็น (สว่าง ถึง มืด ตามลำดับ) การอ่านค่าอุณหภูมิ IR แสดงถึงอุณหภูมิของจุดที่กำหนดเป้าหมายโดย Crosshairs และในเวลาเดียวกันอุณหภูมิที่แสดงจุดร้อนและเย็นจะปรากฏบนหน้าจอ
- กลไกสั้นๆ เพื่อหยุดหรือจับภาพ กด “OK” เพื่อจัดเก็บภาพ หรือกด “SHARE” เพื่อแบ่งภาพด้วยอุปกรณ์สมาร์ทโฟน กดไกอีกครั้งเพื่อยกเลิกภาพ
- กด “LOCK” เพื่อล็อคช่วงอุณหภูมิศาสตร์ปัจจุบันกด “LOCK” อีกครั้งเพื่อทำการยกเลิก
How to use : Basic step and easy to use;
- Press and hold the Power button for >2 seconds to power ON. The logo startup screen will appear followed by the thermal image display. If the battery requires recharging, refer to Section 2 below.
- Point the unit toward the area or object of interest and view the thermal image. Relative temperature is represented by color, hot to cold (light to dark, respectively). The IR Temperature reading represents the temperature of the spot targeted by the Crosshairs, at the same time the hot and cold point temperature will displayed on the screen.
- Short trigger to freeze/capture the image. Press “OK” to save image or press “SHARE” to share the image with smart devices. Trigger again to discard the image.
- Press “LOCK” to Lock current science temperature range, Press “LOCK” again to discard.
เปิดเครื่องและชาร์จเครื่อง
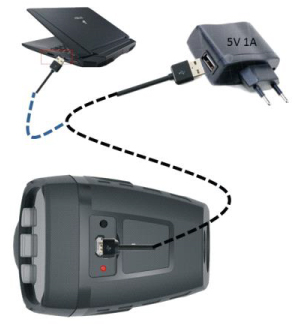
เมื่อเปิดเครื่อง สถานะแบตเตอรี่ขึ้นรูปสัญลักษณ์  ตั้งอยู่ที่ด้านบนซ้ายของจอแสดงผล เมื่อพลังงานแบตเตอรี่เหลือน้อย ให้เชื่อมต่อกับแหล่งจ่ายไฟ AC ของพอร์ต USB ของคอมพิวเตอร์โดยใช้สาย USB ที่ให้มา (พอร์ต USB ตั้งอยู่ที่ด้านบนของตัวเครื่อง) เมื่อปิดเครื่อง ไฟ LED ชาร์จแบตเตอรี่สีแดงจะติดเมื่อเชื่อมต่อกับแหล่งจ่ายไฟ AC หรือเชื่อมต่อกับพอร์ต USB ของคอมพิวเตอร์ ถ้าไฟชาร์จ LED สีแดงดับ แสดงว่าแบตเตอรี่เต็ม
สามารถเปิดและใช้งานเครื่องได้ในขณะที่กำลังชาร์จซึ่งสัญลักษณ์แบตเตอรี่  จะเคลื่อนไหวที่ด้านซ้ายบน
Powering and charging the thermal imager
Press and hold the power button for > 2 seconds to switch ON the unit. A start-up screen (a thermal image) will appear. The unit is now ready to use; to switch Off, press and hold for > 2 seconds. Note that the Auto Power period of time.
With the power ON, the battery status icon is located at the top left of the display. When battery power is low, connect to an AC source or a computer USB port using the supplied USB cable (USB port is located at top of the unit).
With power OFF, the battery charging Red LED is ON when connected to an AC source of connected to a computer USB port. If the Red LED is off, it indicate the battery is full.
The unit can also be powered up and in use while charging in which case the battery symbol is animated on the upper left.
ควบคุมปุ่มและไกยิง
- ปุ่มเปิด / ปิด / ล็อค กดค้างไว้ > 2 วินาทีเพื่อเปิดหรือปิดมิเตอร์; กดสั้น ๆ เพื่อออกจากหน้าจอเมนู ทั้งนี้ใช้เพื่อล็อคย่านการวัดอุณหภูมิปัจจุบัน (ปุ่มซอฟแวร์
 จะปรากฏบนหน้าจอด้านบนของปุ่ม เมื่อปุ่มการทำงานนี้สามารถใช้งานได้
 - OK/MENU Button กดสั้น ๆ เพื่อเข้าถึงเมนูการตั้งค่า ยืนยันการแก้ไข และบันทึกภาพ เมื่อ ได้รับการแจ้งเตือน (ปุ่ม OK จะปรากฏบนหน้าจอด้านบนของปุ่ม เมื่อตัวเลือกนี้พร้อมใช้งาน)
- ปุ่มควบคุมทิศทางลูกศรขึ้นและลง รายการเมนูการตั้งค่า และ เลือกเมนูการตั้งค่า
- ไก/ไฟ LED กดสั้น ๆ เพื่อถ่ายภาพปัจจุบัน กดอีกครั้งเพื่อยกเลิกภาพและกลับสู่โหมดภาพ กดยาวๆจะเปิดหลอดไฟLED กดยาวๆอีกครั้งจะปิดไฟLED
- การวัด, การบันทึก, การลบ, และการทบทวนภาพ
- ชี้กล้องถ่ายความร้อนไปยังวัตถุหรือพื้นที่ที่สนใจ
- ดึงไกเพื่อจับภาพและกดชัตเตอร์ กด SAVE เพื่อบันทึกภาพ กด SHARE เพื่อแบ่งภาพ
- ตรวจสอบภาพ
- ลบภาพในหน่วยความจำภายใน , เข้าถึงเมนูการตั้งค่าและลบภาพที่จัดเก็บ
- เครื่องมือสามารถจัดเก็บภาพได้ 20 ภาพ ในหน่วยความจำภายใน การบันทึกภาพ สามารถโอนไปยัง iOS, android และ PC ผ่าน อุปกรณ์ บลูทูธ ได้
Control Buttons and Trigger
- Power / Back / Lock Button Press and hold >2 seconds to cycle the meter power ON or OFF; Short press to exit a menu screen. Also used to lock the current scene temperature rang (a soft “ ” button will appear on the display above the button when this option is available)
- OK / MENU BUTTON Short press to access the Settings Menu, to confirm an edit, and to save an image when prompted (a soft “OK” button will appear on the display above the button when this option is available)
- UP and DOWN NAVIGATION ARROW BUTTONS Scroll the Settings Menu and select a menu item setting.
- TRIGGER / LED Flashlight Short press will take a snapshot of the current image. Short press again to discard image and return to live image mode. Long press will open the LED flashlight, Long press again will close the LED flashlight.
- Measure, Save, Delete, and Review IR Images
- Point the thermal imager toward the object or area of interest.
- Pull the trigger to capture the image. Press “SAVE” to save image. Press “SHARE” to share the image.
- To review and image.
- To delete images from the internal memory, access the Setting Menu and delete the stored images.
- The unit can storage 20 images on internal memory. The saved images can be transferred to iOS, android , PC and Bluetooth
หน้าจอกล้องถ่ายความร้อน (The IR Thermal Imaging Display)
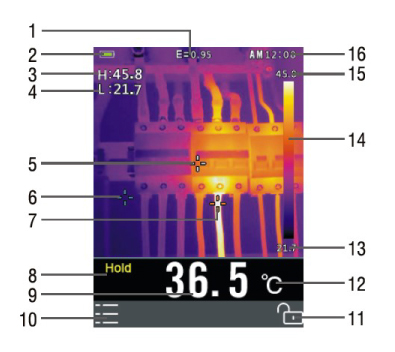
(1.) การตั้งค่า Emissivity ปัจจุบัน (Current Emissivity setting)
(2.) ไฟแสดงสถานะแบตเตอรี่ (Battery indicator)
(3.) จุดอ่านอุณหภูมิที่ร้อนจัด (Hot temperature point reading)
(4.) จุดอ่านอุณหภูมิที่เย็นจัด (Cold temperature point reading)
(5.) ศูนย์เล็ง/จุดเล็งเป้าหมาย (Centre crosshair)
(6.) เล็งอุณหภูมิที่เย็นจัด (Cold temperature crosshair)
(7.) เล็งอุณหภูมิที่ร้อนจัด (Hot temperature crosshair)
(8.) สัญลักษณ์ภาพค้าง (Image freezed icon)
(9.) ศูนย์ชี้การอ่านอุณหภูมิ (Centre temperature point reading)
(10.) ปุ่ม “OK” เพื่อจัดเก็บภาพ ( “OK” button)
(11.) ปุ่มล็อค “LOCK” เพื่อล็อคและยกเลิก (“LOCK” button)
(12.) อุณหภูมิปัจจุบัน (Current temperature unit)
(13.) ภาพอุณหภูมิต่ำ (Scene Low Temperature)
(14.) มาตราส่วน/อัตราส่วนสิ (Palette scale)
(15.) ภาพอุณหภูมิสูงสุด (Scene High Temperature)
(16.) นาฬิกาเวลา (Time clock)
คำแนะนำ
- การใช้งานที่ไม่เหมาะสม อาจทำให้กล้องเสียหายได้ โปรดอ่านและทำความเข้าใจข้อมูลทั้งหมดที่ให้ไว้ในคู่มือและรวมถึงเอกสารอื่น ๆ ก่อนการใช้งาน
- Improper use can damage the meter. Please read and understand all of the information provide in this User Guide and other included documentation before use.
คำเตือน
- อย่ายิงเลเซอร์ใกล้วัตถุอันตรายหรือก๊าซที่ระเบิดง่าย
- อย่ายิงเลเซอร์ใส่ตาหรือบริเวณหน้าของบุคคลตรงข้าม
Warning
- Do not use laser near dangerous object or explosive gas.
- Do not shoot lasers in the eyes or the face of the opposite person.
Specification
|
(Imaging and optical data) ภาพและข้อมูลเกี่ยวกับแสง |
|
|
||||||||||||||||||||||||||||||||||||||||||||||||||||||||||||||||||||||||||||||||||||||||||||||||||
|
Field of View (FOV) มุมมอง |
21×21 |
* |
||||||||||||||||||||||||||||||||||||||||||||||||||||||||||||||||||||||||||||||||||||||||||||||||||
|
(Spatial resolution) ความละเอียดเชิงพื้นฐาน |
4.53mrad |
* |
||||||||||||||||||||||||||||||||||||||||||||||||||||||||||||||||||||||||||||||||||||||||||||||||||
|
NETD |
<0.1℃@30℃(80℉)/100mK |
* |
||||||||||||||||||||||||||||||||||||||||||||||||||||||||||||||||||||||||||||||||||||||||||||||||||
|
(Image frequency) ความถี่ภาพ |
50Hz |
* |
||||||||||||||||||||||||||||||||||||||||||||||||||||||||||||||||||||||||||||||||||||||||||||||||||
|
(Focus mode) โหมดจุดสนใจ |
Focus free |
* |
||||||||||||||||||||||||||||||||||||||||||||||||||||||||||||||||||||||||||||||||||||||||||||||||||
|
Focal Plane Array (FPA) / Spectral range |
Uncooled micro bolometer / 8–14 µm |
* |
||||||||||||||||||||||||||||||||||||||||||||||||||||||||||||||||||||||||||||||||||||||||||||||||||
|
(IR Resolution) ความคมชัด |
|
80X80 |
||||||||||||||||||||||||||||||||||||||||||||||||||||||||||||||||||||||||||||||||||||||||||||||||||
|
(Image presentation) การนำเสนอภาพ |
|
|
||||||||||||||||||||||||||||||||||||||||||||||||||||||||||||||||||||||||||||||||||||||||||||||||||
|
(Display) จอภาพ |
2″TFT LCD, 240×320 pixels |
* |
||||||||||||||||||||||||||||||||||||||||||||||||||||||||||||||||||||||||||||||||||||||||||||||||||
|
(Color palettes) จานสี |
Iron/Rainbow/Grey/Grey Inverted |
* |
||||||||||||||||||||||||||||||||||||||||||||||||||||||||||||||||||||||||||||||||||||||||||||||||||
|
(Measurement) การวัด |
|
|
||||||||||||||||||||||||||||||||||||||||||||||||||||||||||||||||||||||||||||||||||||||||||||||||||
|
(Object Temperature Range) ย่านอุณหภูมิ |
﹣20℃ to 380℃(﹣4 ºF to 716 ºF) |
* |
||||||||||||||||||||||||||||||||||||||||||||||||||||||||||||||||||||||||||||||||||||||||||||||||||
|
(Accuracy) ความแม่นยำถูกต้อง |
﹢/﹣2℃(+/﹣3.6ºF)or ﹢/﹣2% of reading |
* |
||||||||||||||||||||||||||||||||||||||||||||||||||||||||||||||||||||||||||||||||||||||||||||||||||
|
(Measurement Analysis) การวิเคราะห์การวัด |
|
|
||||||||||||||||||||||||||||||||||||||||||||||||||||||||||||||||||||||||||||||||||||||||||||||||||
|
(Spot meter ) |
Center Spot |
* |
||||||||||||||||||||||||||||||||||||||||||||||||||||||||||||||||||||||||||||||||||||||||||||||||||
|
(Automatic Hot/Cold Detection) |
Auto hot or cold markers |
* |
||||||||||||||||||||||||||||||||||||||||||||||||||||||||||||||||||||||||||||||||||||||||||||||||||
|
(Emissivity Correction) การแก้ปัญหาการแผ่รังสี |
8 pre-define level and Variable from 0.01 to 1.0 |
* |
||||||||||||||||||||||||||||||||||||||||||||||||||||||||||||||||||||||||||||||||||||||||||||||||||
|
(Storage of Images) ที่เก็บภาพ |
|
* |
||||||||||||||||||||||||||||||||||||||||||||||||||||||||||||||||||||||||||||||||||||||||||||||||||
|
(Image Storage format) รูปแบบการจัดเก็บภาพ |
Bitmap (BMP), including measurement data. |
* |
||||||||||||||||||||||||||||||||||||||||||||||||||||||||||||||||||||||||||||||||||||||||||||||||||
|
(Data Communication Interfaces) การถ่ายข้อมูล |
|
|
||||||||||||||||||||||||||||||||||||||||||||||||||||||||||||||||||||||||||||||||||||||||||||||||||
|
(Bluetooth) บลูทูธ |
|
* |
||||||||||||||||||||||||||||||||||||||||||||||||||||||||||||||||||||||||||||||||||||||||||||||||||
|
(Power System) ระบบพลังงาน |
|
|
||||||||||||||||||||||||||||||||||||||||||||||||||||||||||||||||||||||||||||||||||||||||||||||||||
|
(Battery) แบตเตอรี่ |
Li-ion battery, 4 hours operting time |
* |
||||||||||||||||||||||||||||||||||||||||||||||||||||||||||||||||||||||||||||||||||||||||||||||||||
|
(Input Voltage) แรงดันไฟฟ้าขาเข้า |
DC 5V |
* |
||||||||||||||||||||||||||||||||||||||||||||||||||||||||||||||||||||||||||||||||||||||||||||||||||
|
(Charging System) ระบบชาร์จไฟ |
In camera(AC adapter) |
* |
||||||||||||||||||||||||||||||||||||||||||||||||||||||||||||||||||||||||||||||||||||||||||||||||||
|
(Power Management) การจัดการพลังงาน |
Automatic shutdown ปิดเครื่องอัตดนมัติ |
* |
||||||||||||||||||||||||||||||||||||||||||||||||||||||||||||||||||||||||||||||||||||||||||||||||||
|
(Environmental Data) ข้อมูลด้านสิ่งแวดล้อม |
|
|
||||||||||||||||||||||||||||||||||||||||||||||||||||||||||||||||||||||||||||||||||||||||||||||||||
|
(Operating Temperature Range) ช่วงการทำงานของอุณหภูมิ |
﹣20℃ to 50℃(﹣4°F to 122°F) |
* |
||||||||||||||||||||||||||||||||||||||||||||||||||||||||||||||||||||||||||||||||||||||||||||||||||
|
(Storage Temperature Range) ที่เก็บอุณหภูมิ |
﹣40℃ to 70℃(﹣40°F to 158°F) |
* |
||||||||||||||||||||||||||||||||||||||||||||||||||||||||||||||||||||||||||||||||||||||||||||||||||
|
(Humidity)(operating and storage) ความชื้น |
10% to 90% |
* |
||||||||||||||||||||||||||||||||||||||||||||||||||||||||||||||||||||||||||||||||||||||||||||||||||
|
(Drop test) การทดสอบการตก |
2m (2เมตร) |
|
สินค้าที่เกี่ยวข้อง


Bosch
Eibenstock

Jasic

Stanley

Makita
